Friday, March 13, 2015

App Timeline Server not starting Or Downgrade Ambari

This can also be used as a downgrade guide from Ambari 1.7.0 to 1.6.1.

If using HDP 2.1.2 with Ambari 1.7.0 your App Timeline Server does not start, you come to the right place. 
Symptoms: running the ATS from Ambari throws:
Fail: Execution of ‘ls /var/run/hadoop-yarn/yarn/yarn-yarn-timelineserver.pid >/dev/null 2>&1 && ps cat /var/run/hadoop-yarn/yarn/yarn-yarn-timelineserver.pid` >/dev/null 2>&1′ returned 1.
All services work fine. I have set the recommended configuration for HDP 2.1.2
yarn.timeline-service.store-class = org.apache.hadoop.yarn.server.applicationhistoryservice.timeline.LeveldbTimelineStore

The History Server is running fine. 

Not the ideal solution but it worked for me. Since this is kind of related to Ambari versions I reverted back to 1.6.1, steps:
1. Stopped and removed ambari server and all agents
2. Deleted repo and any directories for ambari
3. Downloaded and installed ambari 1.6.1
4. Re-configured/installed cluster, as HDP version remained the same
5. Formatted namenode and hbase
6. Change the config: 


yarn.timeline-service.store-class = org.apache.hadoop.yarn.server.applicationhistoryservice.timeline.LeveldbTimelineStore
7. Start ATS, failed, checked logs for historyserver, error: 

Permission denied on /hadoop/yarn/timeline/leveldb.timeline-store.ldb/LOCK
8. Deleted the leveldb-timeline-store.ldb
9. Restarted ATS, worked fine!

Usually I never got this issue for other cluster installs using HDP 2.2 and Ambari 1.7.0.

Changing Storage in Hadoop

After I installed a HDP 2.1.2 cluster, I noticed that all the nodes were not using the drive partition planned for storage. The Linux boxes had OS partition and data data partition. Assigned during OS install one set to OS and other for data storage.

Somehow the data storage was not available on cluster installation most probably since it was not mounted. Following are the steps performed to change HDFS storage location, along with any drive configuration needed.

First format and optimized the partition or drive.
mkfs -t ext4 -m 1 -O dir_index,extent,sparse_super /dev/sdb

Create a mount directory
mkdir -p /disk/sdb1

Mount with optimized settings
mount -noatime -nodiratime /dev/sdb /disk/sdb1

Append to fstab file so that the partition is mounted on boot (very critical)
echo "/dev/sdb /disk/sdb1 ext4 defaults,noatime,nodiratime 1 2" >> /etc/fstab

Add folder for hdfs data
mkdir -p /disk/sdb1/data

Location to store Namenode data
mkdir -p /disk/sdb1/hdfs/namenode

Location to store Secondary Namenode
mkdir -p /disk/sdb1/hdfs/namesecondary

Set these in hdfs-site.xml or through Ambari
dfs.namenode.name.dir = /disk/sdb1/hdfs/namenode
dfs.namenode.name.dir = /disk/sdb1/hdfs/namesecondary
dfs.datanode.data.dir = /disk/sdb1/data

Set permissions
sudo chown -R hdfs:hadoop /disk/sdb1/data

Format namenode
hadoop namenode -format

Start namenode through ambari or CLI
hadoop namenode start

Start all nodes and services. The new drive should be listed.

References:
http://www.slideshare.net/leonsp/best-practices-for-deploying-hadoop-biginsights-in-the-cloud


Thursday, December 11, 2014

RStudio setup on Hortonworks Hadoop 2.1 Cluster

Here is a complete set of steps I performed to set up R and RStudio on a small cluster.

Installing R and Rstudio
-- R should be installed on the node which have Hive server
-- RStudio can be installed anywhere. (I installed on edge node)

sudo rpm -Uvh http://dl.fedoraproject.org/pub/epel/6/x86_64/epel-release-6-8.noarch.rpm
sudo yum -y install git wget R
ls /etc/default
sudo ln -s /etc/default/hadoop /etc/profile.d/hadoop.sh
cat /etc/profile.d/hadoop.sh | sed 's/export //g' > ~/.Renviron

Check latest version of RStudio @
http://www.rstudio.com/products/rstudio/download-server/
(It should have installation steps, follow those)
Listing them here for completion with current release version)
$ sudo yum install openssl098e # Required only for RedHat/CentOS 6 and 7
$ wget http://download2.rstudio.org/rstudio-server-0.98.1091-x86_64.rpm
$ sudo yum install --nogpgcheck rstudio-server-0.98.1091-x86_64.rpm

Create a new system user and set password
sudo useradd rstudio
sudo passwd rstudio
>> hadoop

Login to RStudio at http://hostname:8787

Install required packages either from
In RStudio >> Tool >> Install packages
OR
install.packages( c('RJSONIO', 'itertools', 'digest', 'Rcpp', 'functional', 'plyr', 'stringr'), repos='http://cran.revolutionanalytics.com')
install.packages( c('bitops', 'reshape2'), repos='http://cran.revolutionanalytics.com')
install.packages( c('RHive'), repos='http://cran.revolutionanalytics.com')

Download latest rmr2 package from:
https://github.com/RevolutionAnalytics/RHadoop/wiki/Downloads
Winscp tar.gz file and install through Rstudio

### Need to run every time RStudio is initialized or restarted
Set environment variables in RStudio
Sys.setenv(HADOOP_HOME="your hadoop installation directory here e.g. /usr/lib/hadoop")
Sys.setenv(HIVE_HOME="your hive installation directory here e.g. /usr/lib/hive")
XX Sys.setenv(HADOOP_CONF_DIR="/etc/hadoop/conf/") do not execute!

Sys.setenv("RHIVE_FS_HOME"="your RHive installation directory here e.g. /home/rhive")
This needs to be local directory on the node with hive installed, create one if doesnt exist. The user created (rstudio) have chown -R rights on this local directory.
If not this is the error:
Error: java.io.IOException: Mkdirs failed to create file:/home/rhive/lib/2.0-0.2

library(RHive)
rhive.init()
rhive.connect(host="IP ADDRESS/Hostname", port=10000, hiveServer2=TRUE)

If error
Error: java.sql.SQLException: Error while processing statement: file:///rhive/lib/2.0-0.2/rhive_udf.jar does not exist.
check if the jar file is in the said directory and rstudio user has permission on it.

Hope it helps.

Cheers!

References and Thanks:
http://jsolderitsch.wordpress.com/hortonworks-sandbox-r-and-rstudio-install/

Monday, December 9, 2013

Excel + SQL Server Linked Server Troubleshooting

Following is a great article to troubleshoot errors thrown by OLEDB when connecting an Excel file from OPENROWSET query:

OLE DB provider "MICROSOFT.JET.OLEDB.4.0" for linked server "(null)" returned message "Unspecified error".

Gives step by step resolution to multiple errors like:
- Cannot initialize the data source object of OLE DB provider "MICROSOFT.JET.OLEDB.4.0" for linked server "(null)".
- Cannot get the column information from OLE DB provider "MICROSOFT.JET.OLEDB.4.0" for linked server "(null)".
- SQL Server blocked access to STATEMENT 'OpenRowset/OpenDatasource' of component 'Ad Hoc Distributed Queries' because this component is turned off as part
of the security configuration for this server. A system administrator can enable the use of 'Ad Hoc Distributed Queries' by using sp_configure.
For more information about enabling 'Ad Hoc Distributed Queries', see "Surface Area Configuration" in SQL Server Books Online.

On client deployments my recurring issue was setting my access to temp folders for service accounts.

Tuesday, November 26, 2013

Build Hierarchy From Delimited String

In this post we create a parent child hierarchy (n level) from a delimited string like [Parent_Child_LeafChild].

What we are looking for is taking a n length string like "Stage1_Stage2_Stage3" and moving it into a table to build this:
Stage1
--Stage2
----Stage3

DECLARE @separator_position INT -- This is used to locate each separator character
DECLARE @array_value VARCHAR(1000)-- this holds each array value as it is returned
DECLARE @separator char(1) --Used in WHERE clause

declare @StageLevel varchar(255) = 'Stage1_Stage2_Stage3'
declare @holder varchar(255) = @stagelevel
SET @separator = '_' --Separator A.K.A. Delimiter
SET @StageLevel = @StageLevel + @separator --append ',' at the end
-- select PATINDEX('%[' + @separator + ']%', @StageLevel)
Declare @Level int = 0
Declare @ParentId int

  WHILE PATINDEX('%[' + @separator + ']%', @StageLevel) <> 0
      BEGIN -- patindex matches the a pattern against a string
             SELECT @separator_position = PATINDEX('%[' + @separator + ']%',@StageLevel)

             SELECT @array_value = LEFT(@StageLevel, @separator_position - 1) 
                      set @level = @level +1

                     --select @array_value, @level
                     IF @level =1 --This is parent node
                     Begin
                           insert into Hierarchy (StageLevelName, StageLevel)    
                           values (@array_value, @Level)
                     END   
                     ELSE
                     BEGIN
                           insert into Hierarchy (StageLevelName, StageLevel, ParentID)
                           values (@array_value, @Level, @ParentId)
                     END
                     set @ParentId = @@IDENTITY
                     select @ParentId
                     --Moving to end of array
                     SELECT @StageLevel = STUFF( @StageLevel, 1, @separator_position, '')
      END

The end result will be a table with each row as a recursive hierarchy. Plus it has level information for depth.

Wednesday, October 16, 2013

Moving Closer To MCSA: SQL Server 2012


Last week I passed:
Exam 457 Transition your MCTS on SQL Server 2008 to MCSA: SQL Server 2012 -Part 1

Which will help me to qualify for Microsoft Certified Solutions Associate for SQL Server 2012. Now am preparing for 458 (Part 2).


The exam was moderately hard and I had doubts about couple of questions. Anyways getting through the course material helped me a lot in knowing SQL Server 2012.


Cheers!

Wednesday, June 20, 2012

Content Organizer Rule Manager for SharePoint 2010


I am proud to release the beta version of Content Organizer Rule Manager (codename CORMa) for SharePoint 2010 today.

Background:
Working on a SharePoint 2010 enterprise project we had tons of content types on differest site. Creating and tracking content organizer rules from SharePoint interface was tedious going back and forth between pages. There is no option in SharePoint Designer to manager content organizer rules. Lastly there was a need to bulk create rules as some of our libraries had multiple content types associated.

CORMa to the rescue!
  • List and create content organizer rules in bulk.
  • Delete rules.
  • Works for all field types inlcuing Taxonomy fields.
  • Export all site content types with associated lists to text file.
  • Check inherent SharePoint rules for rule creation.
Download, test and give feedback...

Tuesday, June 19, 2012

XSL Link for SharePoint 2010 Web Parts

When using a lot of Links list in SharePoint 2010 the view can be quite 'boring'. To add some spice I have created an XSL style sheet and applied to List webpart through web part properties. Easy and fast:
  1. Get the XSL style sheet.
  2. Modify (if required)
  3. Upload to Style Library > XSL Style Sheets
  4. Edit web part and under Miscellaneous > XSL Link paste the path.
  5. Set Appearance > Chrome Type to 'Border Only'. Apply and save.
 Style classes are embedded in the XSL file which you may move on to your CSS files.
This would work on any list which is created on 'Link' list. I have added some logic to get list name (title) using XSL functions as it is pretty hard to do so. Let me know if someone knows an easier way, I can get the title in SharePoint Designer but on actual page it disappears. I think the View node is not available when XSL renders on page.
   
Again, this XSL is targeted towards Links list in SharePoint 2010 but can be extended/reused for other libraries as well. Just change [@Columns] as per your CAML.

<xsl:stylesheet version="1.0"
  xmlns:xsl=http://www.w3.org/1999/XSL/Transform
  xmlns:msxsl="urn:schemas-microsoft-com:xslt"
  exclude-result-prefixes="msxsl"
  xmlns:ddwrt2="urn:frontpage:internal">
<xsl:output method='html' indent='yes'/>

<xsl:template match='dsQueryResponse' xmlns:ddwrt="http://schemas.microsoft.com/WebParts/v2/DataView/runtime">

<style>
  .QLinksHeader{
            PADDING-BOTTOM: 2px; PADDING-LEFT: 2px; PADDING-RIGHT: 2px;
            DISPLAY: block; MARGIN-BOTTOM: 2px; BACKGROUND: #0d5995; COLOR: white;
            FONT-SIZE: 14px; PADDING-TOP: 2px }
  #QLinks {
            PADDING-BOTTOM: 0px; LIST-STYLE-TYPE: none; MARGIN: 0px;
            PADDING-LEFT: 0px; PADDING-RIGHT: 0px; PADDING-TOP: 0px; }
  #QLinks LI {
            BACKGROUND-IMAGE: url(/_layouts/images/icongo.gif); PADDING-LEFT: 2em;
            BACKGROUND-REPEAT: no-repeat; MARGIN-LEFT: 8px; FONT-SIZE: 12px;
            PADDING-BOTTOM: 5px }
  #QLinks LI a:hover{ text-decoration:underline; }
</style>

  <div cellpadding="10" cellspacing="0" border="1" >
    <SPAN class="QLinksHeader">
      <xsl:value-of select=" substring-before(substring-after(/dsQueryResponse/Rows/Row/@FileRef,'Lists/'),'/')" >
      </xsl:value-of>
    </SPAN>
    <ul id="QLinks">
      <xsl:apply-templates select='Rows/Row'/>
    </ul>
  </div>
</xsl:template> <xsl:template match='Row'>
  <li>
    <a href="{@URL}">
      <xsl:value-of select="@URL.desc" ></xsl:value-of>
    </a>
  </li>
</xsl:template>
</xsl:stylesheet>

Friday, December 2, 2011

Installing SQL Server 2012 RC0 on Windows 7


SQL Server 2012 RC0, formerly known as “Denali”, is available to download. Got my copy and started installing on a copy on Windows 7 virtual box. The installation was smooth. 

Here are the steps:

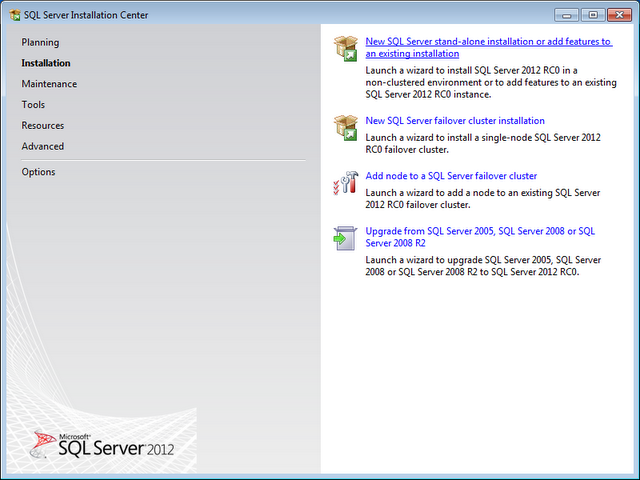
After extracting the download file, double click the setup.exe. Select the first option under installation to install a stand alone version.Some checks, no issues.
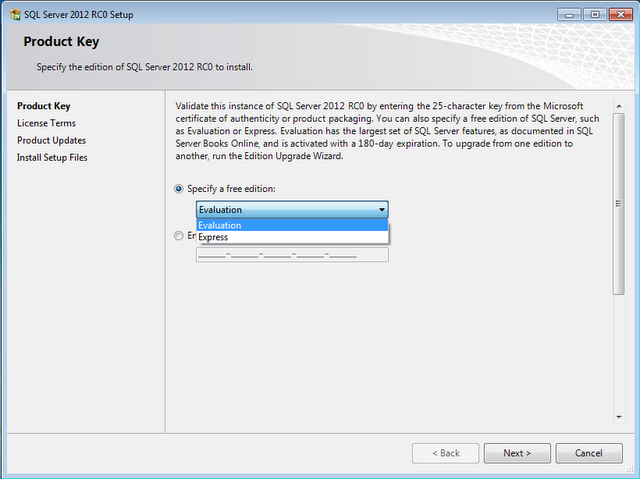
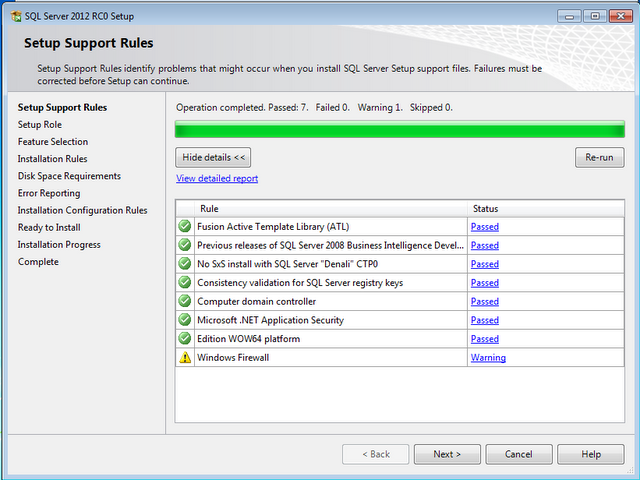
Choose what type of edition you want to get.Some more checks.
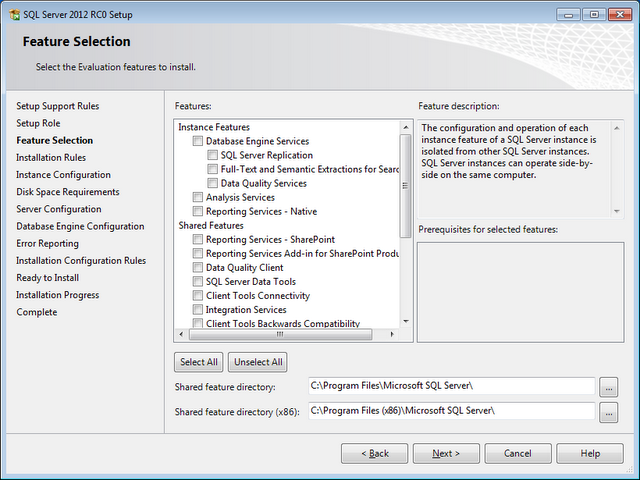
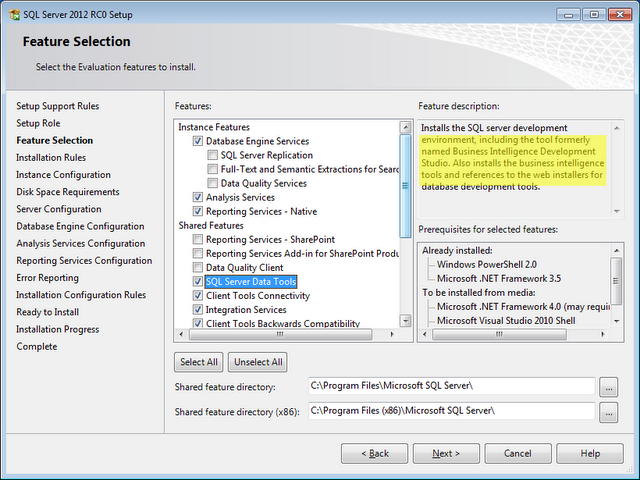
Standard feature installation.Select the components.
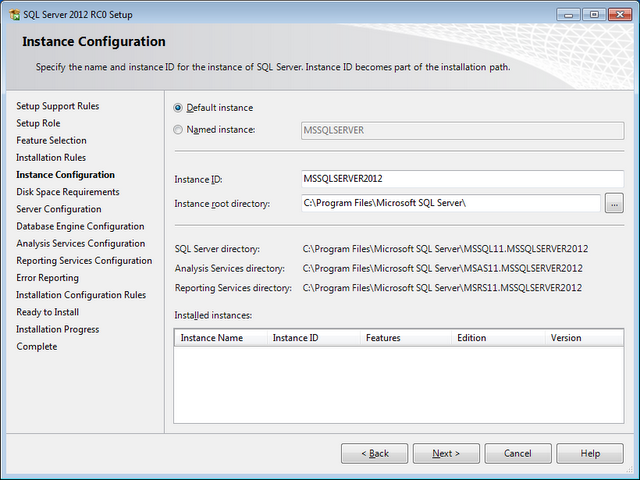
Wondering where is BIDS; it’s been named to SQL Server Data Tools.Setup the instance id.
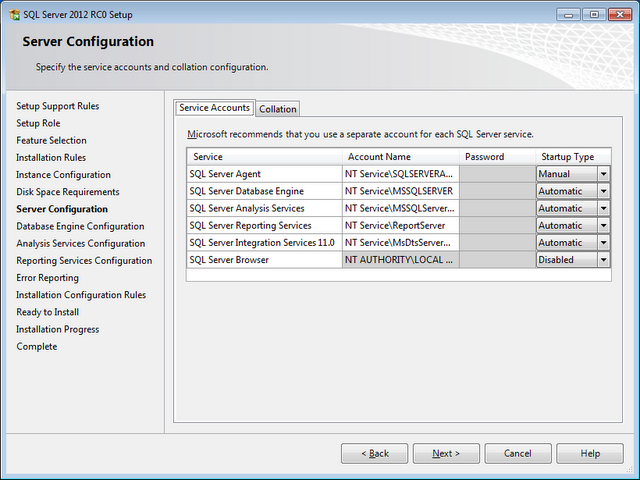
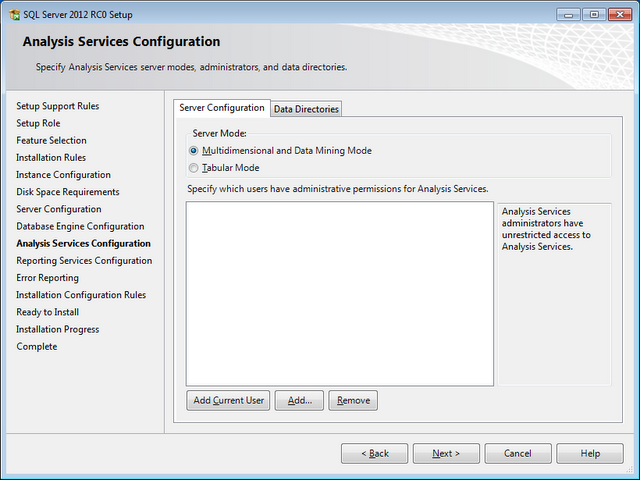
Configure roles to be used.Analysis services configurations.
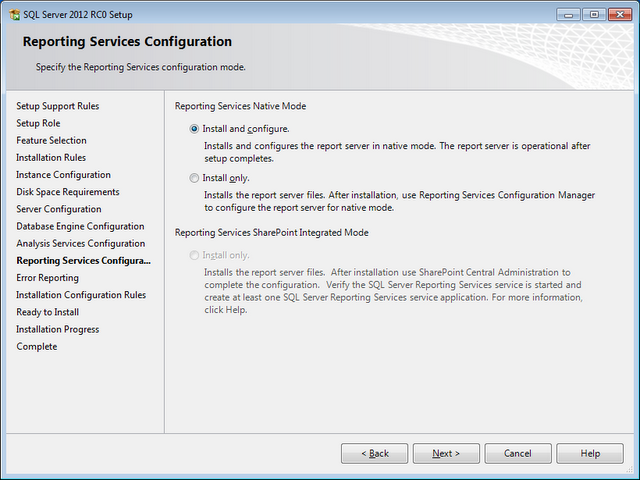
Reporting Services settings.

Hit ‘Next’, rest of the steps are linear and at the end you have a successful SQL Server 2012.

Thursday, December 1, 2011

AdventureWorks and SQL Server 2012 RC0 and Access Denied

While attaching AdventureWorksDWDenali_Data.mdf to SQL Server 2012 RC0 if you get this error:
Unable to open the physical file "C:\Data\AdventureWorksDWDenali_Data.mdf". Operating system error 5: "5(Access is denied.)".

To fix Right Click --> Properties --> Security


Give Full Control access to the account you would be using.


Attach to database again.

Monday, November 21, 2011

Find out SQL Server Edition

Here is a query to find out what version and edition of SQL Sever you are using:

SELECT SERVERPROPERTY('edition') as Edition,
SERVERPROPERTY('productversion') ProdVersion,
SERVERPROPERTY('productlevel') as Lvl

Monday, August 29, 2011

Clear Analysis Services Cache

To test execution time of calculated measures from cold cache instead of warm cache run this query on Analysis Services MDX query editor:


<Batch xmlns="http://schemas.microsoft.com/analysisservices/2003/engine">
 <ClearCache>
<Object>
  <DatabaseID>NameOfCube</DatabaseID>  
</Object>
 </ClearCache>
</Batch>

Analysis Services Default Member Through Stored Procedure

Today, I had to dynamically assign default member value to an analysis services dimension. Scenario: Each user (AD login) has a preferred or default value assigned on time basis. So depending on which date data is sliced it always comes up with the value default of the current user.
For this we would need to create a mapping table in Relational database with date, user and default value.
Create a basic User Stored Procedure (uspGetUserDefaultValue) which takes username (AD Login) as a parameter, selects on the mapping table based on username passed and returns a single value.
Now we create a solution in Visual Studio 2008. This can be of class project template. We would be creating a custom DLL and register with SQL Server Analysis Services solution. Where SSAS solution would use function calls exposed by custom DLL. I created the project as part of my SSAS solution for better manageability.
We would need to add:
Microsoft.AnalysisServices
Microsoft.AnalysisServices.AdomdClient
as reference to our custom dll project. These can be of version 10 (SQL 2008) or version 9 (SQL 2005). Works fine with either, seamlessly interchangeable.
Now we create/rename our namespace and class to like
Project/Assembly: AnalysisServicesCustomLibrary
Namespace: CustomMethodCollection
Class: CustomMethods
or whatever you like.
Create a public static function like:
public static string GetUserDefaultValue(string userName)
{
OleDbConnection connection;
        try
        {
         connectionString ="provider=sqloledb;server=;database=;trusted_connection=yes";
           connection= new OleDbConnection(connectionString);
           connection.Open();
           OleDbCommand command= new OleDbCommand("uspGetUserDefaultValue", connection);
               command.CommandTimeout = 0;
               command.CommandType = CommandType.StoredProcedure;
               command.Parameters.Add(new OleDbParameter("@UserLogin", OleDbType.VarChar, 50));
               command.Parameters[0].Value = userName;
               
               DataTable dataTable = new DataTable("DefaultValue");
               OleDbDataAdapter dataAdapter= new OleDbDataAdapter(command);
               dataAdapter.Fill(dataTable);
               connection.Close();
               if (dataTable.Rows.Count == 0)
                   return "empty";
               string defaultValue = dataTable.Rows[0][0].ToString();
               return "[Dimension].[Dimension Attribute].&[" + defaultValue + "]";
           }
           catch (Exception ex)
           {
               errorMessage = "Some error: " + ex.Source + " Message: " + ex.Message;
               throw new Exception(errorMessage, ex);
           }
       }
The return part is critical since here we would be formatting the return value into a MemberUniqueName for the associated dimension attribute. Else is basic stuff, feel free to add better exception handling etc.

Do a quick test to see if you are getting the desired output from Stored Procedure and Class Function.
Now we move to Analysis Services solution. First step is to add reference to AnalysisServicesCustomLibrary project under Assemblies folder.
Next move to the dimension where you would like to have a default value. Go to properties of the attribute that would have the default value. Under DefaultMember enter:
STRTOMEMBER( AnalysisServicesCustomLibrary.CustomMethodCollection.CustomMethods.GetUserDefaultValue(UserName))
Here UserName is an Analysis Services keyword to get current logged in user’s account.
STRTOMEMBER converts the string passed by custom library’s function in a member.
Build/Deploy/Process cube. Run a query or browse the cube and you should have the default value against logged in user.


DEBUG
To debug your code, move to your custom library project. Go to Debug-->Attach to Process and select Msmdsrv.exe process. Add a breakpoint and try querying the dimension using the function.
References:

Friday, January 28, 2011

From Date To Date in PerformancePoint Analytical Chart


Today, we add From Date and To Date parameters to Performance Point Server Dashboard Designer’s Analytical Reports. Many times this is a requirement to allow users to select a starting and ending date to view charts/reports. This gives dynamic behavior to time range as compared to using pre-defined date attributes like Month, Week etc.

Start with creating a Report and select Analytical Chart. Add your required Dimensions and Measures including Time dimension.

Once done, move to the Query tab of the report it should be something like below depending on what artifacts you drop :

For demo I am using Time dimension on Bottom Axis and Total Time Decimal on Series. You are free to move time to any other axis. No worries, same process would apply.
From the bottom of the page add parameter from the Parameters section. Name them what you like, for purpose I use FromDate and ToDate. Give default values, these can be any valid dates.

With every parameter you add you would find a value added to your query canvas like <> and <>. For now it does not matter where they are just add parameters.
Move to your query and where ever your time dimension is used replace that with:
HIERARCHIZE ( {<>:<>} )
Your final query would be like:

Save/Publish your report.
In your dashboard section add filters from Filters tab. I am using Time Intelligence Calendar filters but any type of filter can be used.

If you opt to use any other type of filter remember to set your values in Report query respectively.
Now we have our filters and report. We add them to the dashboard page like so:

Now we start linking filters and report. First link FromDate filter like so:

In source value select your data source, here TestFromTo is my data source. Next press Filter Link Formula and type in Day. This defines what level of a hierarchy we would be referencing. Remember to setup Time properties in your data source.
Similarly we link ToDate filter like:

All done. Save/Publish and Preview.

Here dates selected in 14th September, 2009 and the report displays data for that day. Now changing the ToDate to 18th September, 2009 would show:

And we have From Date and To Date filters working on an Analytical Report.
This is very intuitive way of showing data to end users. A lot of stakeholders ask for this feature especially for Trend Charts/Reports.
Downside to this implementation is that we lose the right click contextual features of analytics like drill downs, decomposition tree etc.